Adobe Lightroom Classic runs fine in a Virtual Machine (VM) on Linux for basic culling and editing. But heavy, GPU-based tasks like AI Denoise take a long time, because they have to run fully on the CPU instead. On my Intel Core i7 Gen 13 under Windows with a GeForce RTX 4070 Ti Super, de-noising a Nikon NEF with 45.7MP takes about 6s, in the VM it takes 15min—or about 150 times longer! Also having the catalogue and the images isolated inside the VM is not very practical.
Previously, I used to run the Lightroom catalogue and the images on a shared network drive together with the subst command, but that hack no longer works. It was a shaky setup from the beginning and also suffers from slow I/O performance, especially considering, that Lightroom constantly reads and writes to the catalog SQLite database as well as creates and loads previews from the cache.
A better solution is to run the Lightroom catalogue and the cache directly live from a virtual disk image (.vdi). The disk can then directly be attached as a native storage device to the VM, and crucially, also mounted as a physical disk in Windows using the specialized AIM toolkit.
Here is how to build this robust, hybrid workflow where you can use Linux for daily tasks and quickly fire up a Lightroom VM for culling and basic photo editing. When necessary, shutdown and boot into Windows for heavy, AI-driven tasks like Denoise. Use Duplicati for backups of the catalogue and the photos.
The Architecture of the Setup
To make this cross-OS workflow viable everything revolves around a single, shared NTFS partition. Both, Linux and Windows can read and write to this drive seamlessly:
- The Photos (RAW files): They live in any folder structure of your liking on the NTFS drive and are directly available in Linux and Windows. Additionally, this drive is passed through to the VirtualBox VM as a Shared Folder on Linux,
- The Catalog & Cache: The
.lrcatdatabase and the.lrdatapreview folders live entirely inside the.vdidisk container. This.vdifile is simply stored on the NTFS drive right alongside the photo folders.
This architecture has several further advantages:
- Backup Flexibility: Because the
.vdiand the RAWs are both on a shared drive, you can technically run your backups from either OS. Keeping the photos outside of the.vdikeeps the virtual disk relatively small and fast. - No Vendor Lock-in: The .vdi can also be mounted by QEMU, so you don’t really need to use VirtualBox, especially when planning on implementing GPU passthrough. Furthermore, because the RAW files are sitting natively on a standard drive rather than being trapped inside a virtual disk container, they remain universally accessible by Linux-native software such as Darktable or digiKam without ever needing to boot up a VM or mount a virtual drive.
- No Cross-OS Driver Headaches: Keeping the
.vdifile itself on an NTFS partition means Windows can see the file natively without requiring unstable third-party Linux file system drivers.
Step 1: Create the VDI
Note: When I first built this setup, I created a
.vhdxdrive in Windows Disk Management and moved the catalogue and the caches into it, only to discover later that VirtualBox handles that format poorly, forcing me to converting it into a.vdifile via terminal on Linux. Save yourself the headache and directly create a native.vdifirst on Linux.
Create the VDI Container in Linux: Open a terminal and use VBoxManage to generate a dynamically allocated .vdi. I allocated 250 GB to give my Lightroom catalogue and caches plenty of headroom.
$ VBoxManage createmedium disk --filename /media/simon/IMAGES/LR-Catalog.vdi --size 250000 --format VDIStep 2. Format the VDI
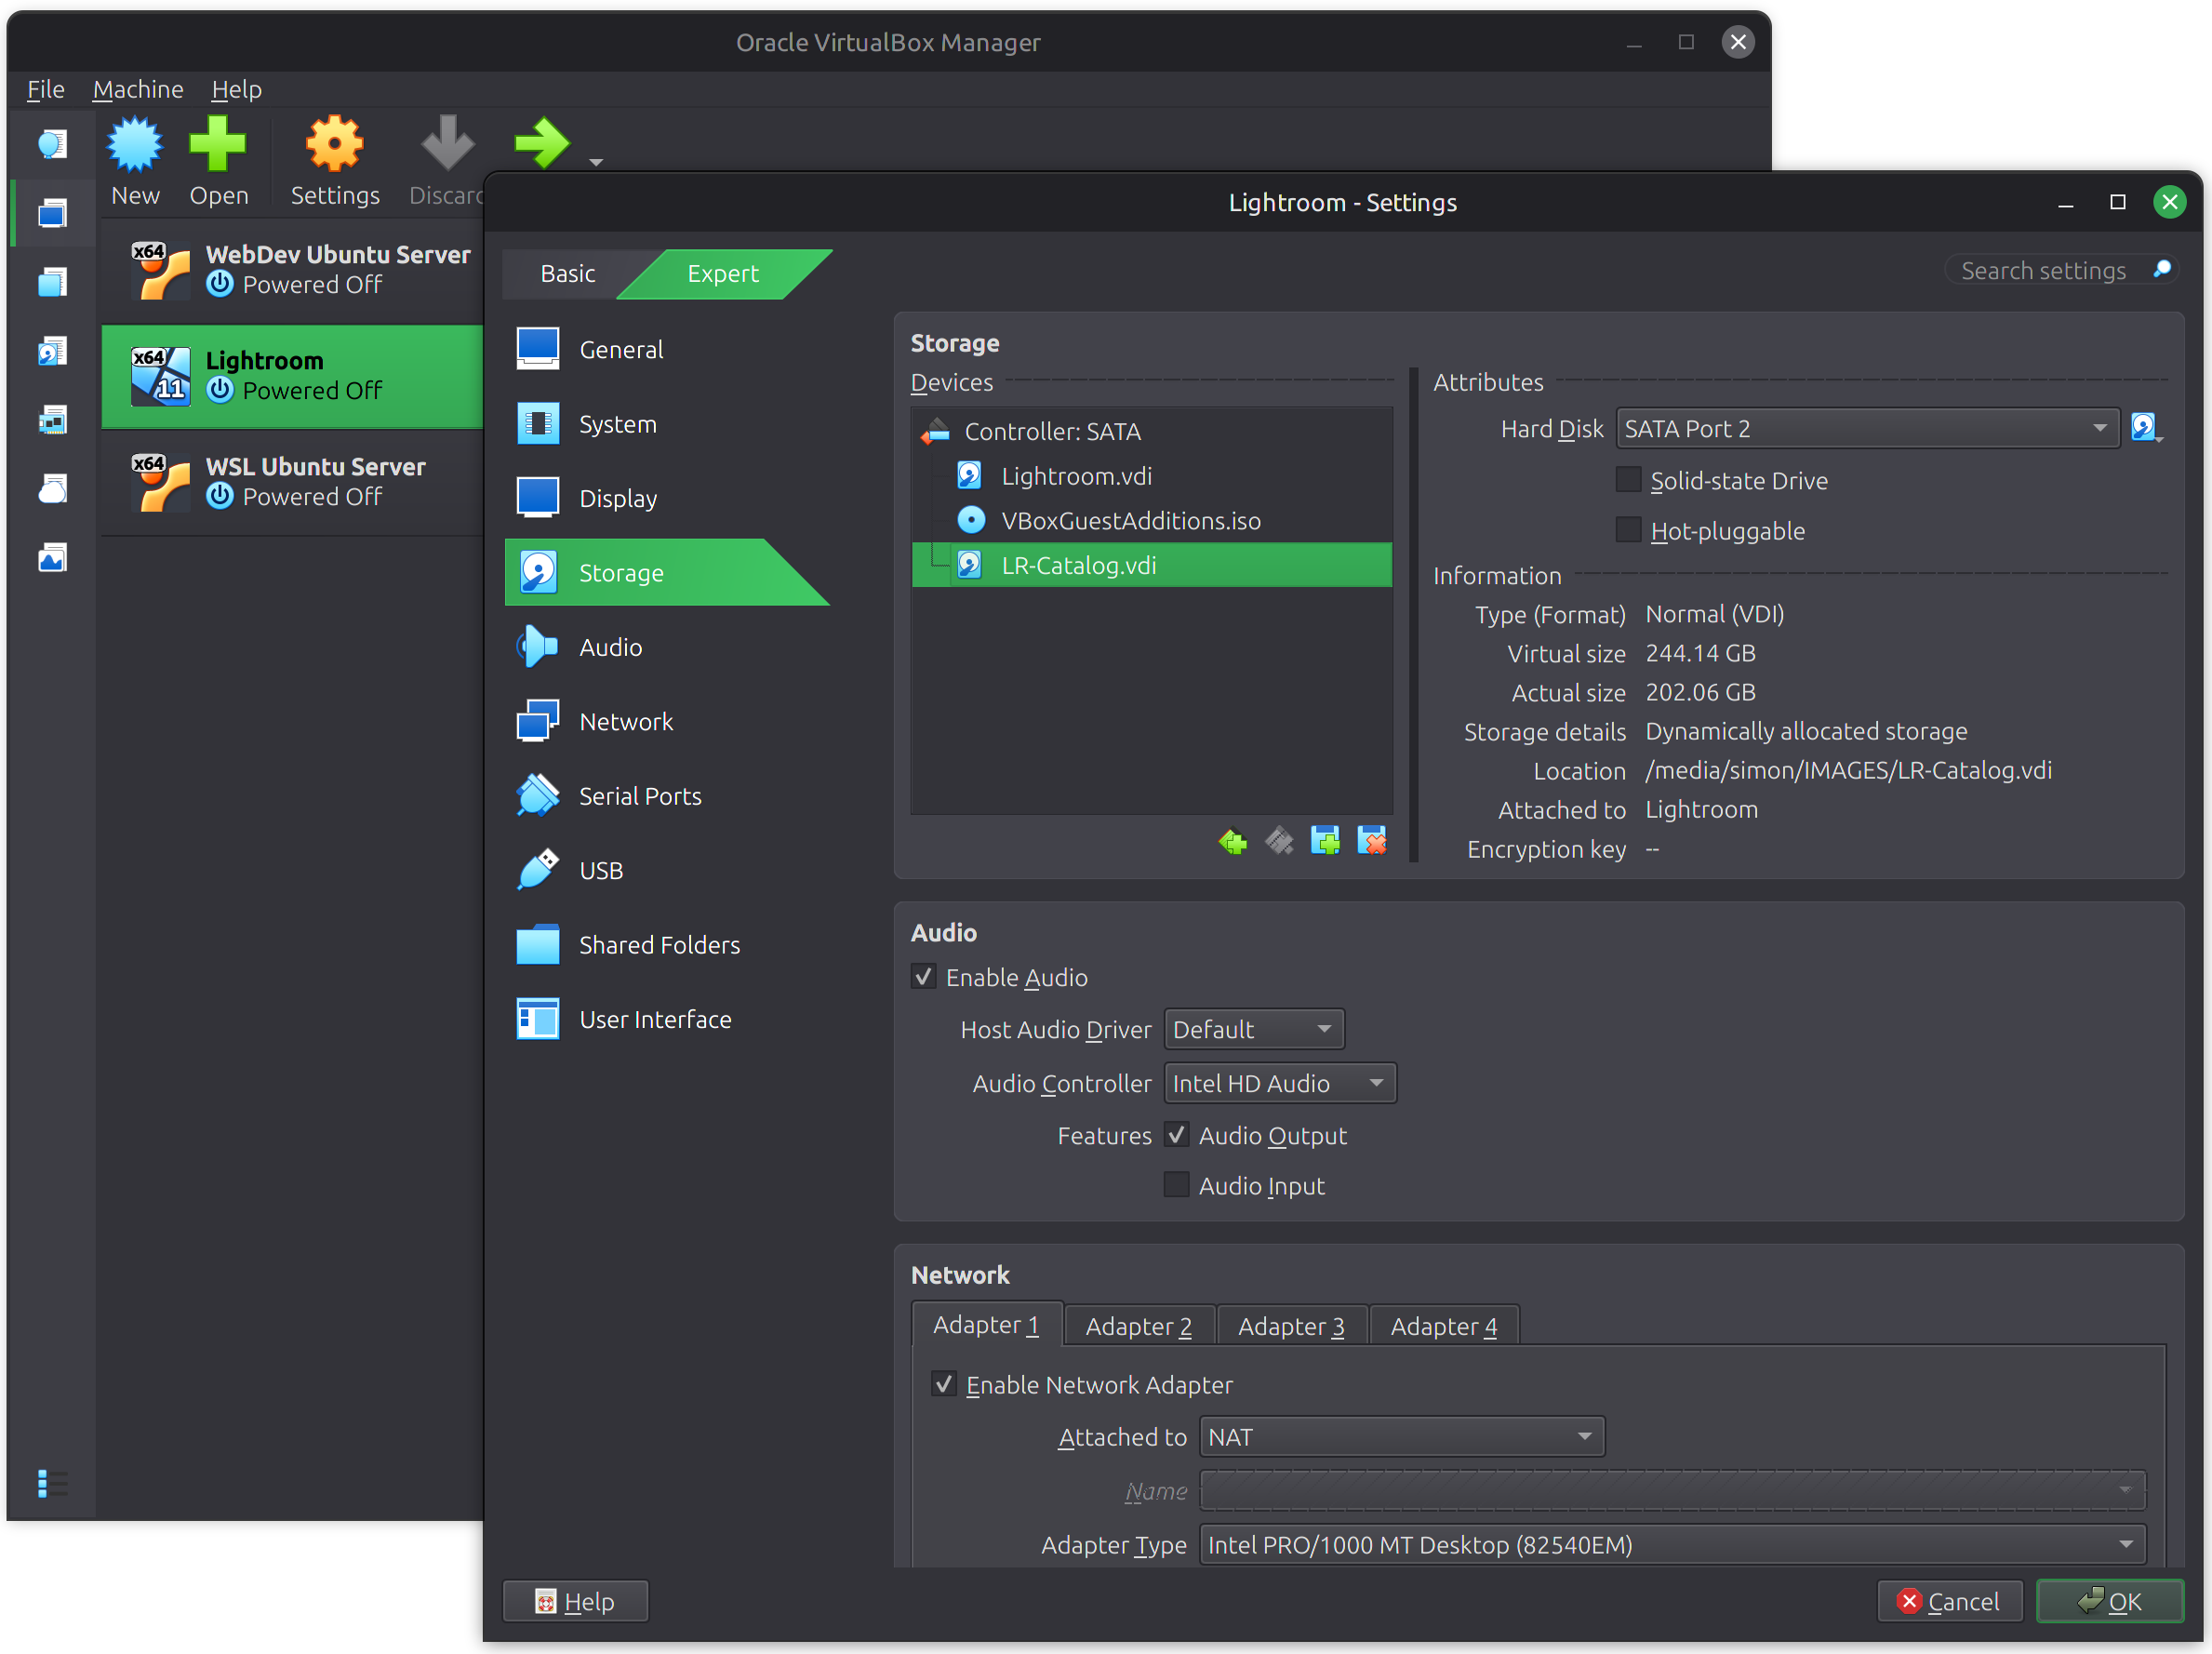
1. Open VirtualBox and go to your Windows VM settings -> Storage, and attach the new LR-Catalog.vdi as a SATA hard disk.
2. Boot the VM and open Windows Disk Management. It will prompt you to initialize the disk. Create a New Simple Volume, format it as NTFS, and assign it a persistent drive letter (I used L: for Lightroom).
3. Shut down the VM. Do not copy your catalog and preview folders through the VirtualBox shared folder interface—the I/O overhead for thousands of files is going to be painfully slow.
Step 3. Move the Catalogue
To move your catalogue and caches at full hardware speed, bypass the VM entirely:
1. Reboot your computer into your native Windows installation.
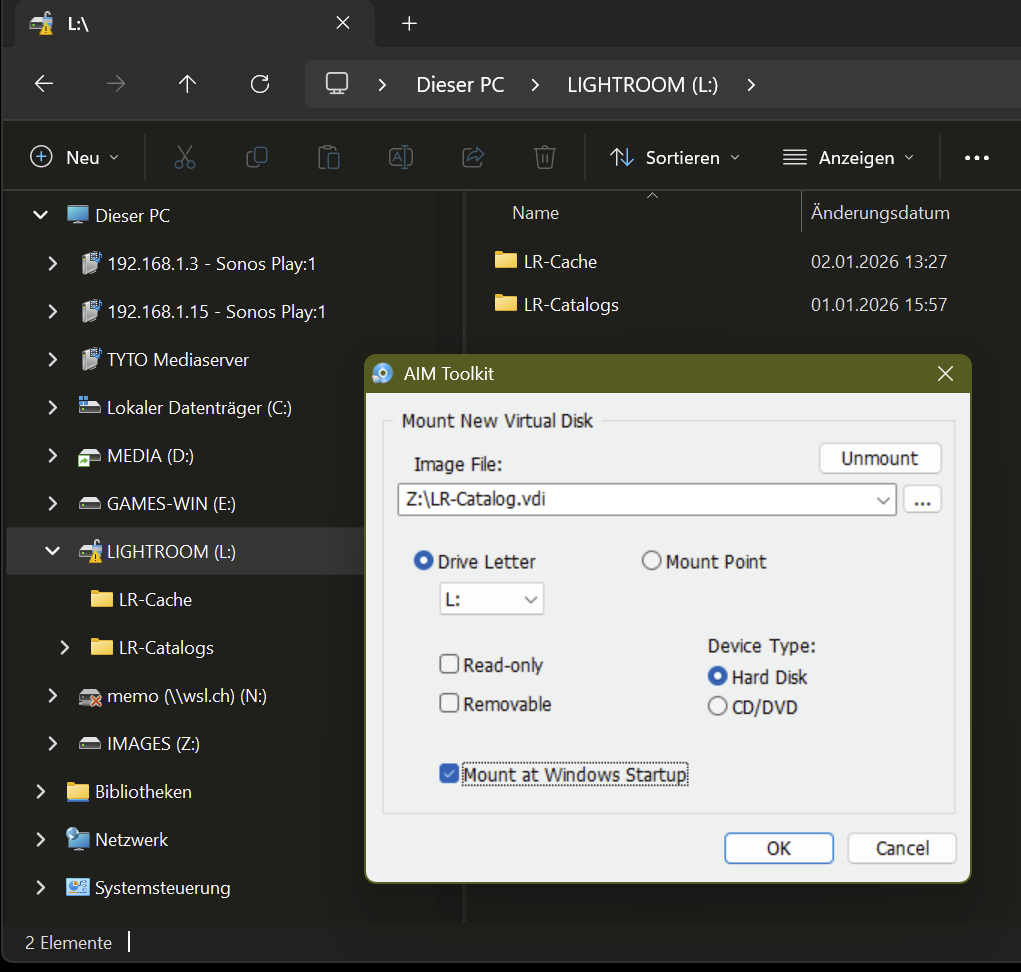
2. Install AIM Toolkit: Download and install the free AIM Toolkit from SourceForge. This tool enables Windows to mount VirtualBox .vdi files as physical SCSI drives using the included Arsenal Image Mounter driver.
3. Open the Mount Image File application from your Windows Start Menu and select your LR-Catalog.vdi file. In the mount options, ensure that Windows assigns it the exact same drive letter (L:) that you used inside the VirtualBox VM.
4. Move the whole Lightroom folder containing the catalogue .lrcat, previews and helper data .lrdata from their old location onto the newly mounted L: drive using Windows Explorer. Double-click the .lrcat file in its new home to test-launch Lightroom.
Step 4: Backup the VDI
Shutdown and boot into Linux to setup the Duplicati backup of the catalogue and the photos by pointing it to the the single LR-Catalog.vdi file and to the folder containing the images. Because Duplicati relies on block-level deduplication, it doesn’t upload the entire 250 GB file. It scans the .vdi, identifies the specific data blocks that changed that day, and only backs up the delta. It is fast, secure, and natively handled by Linux without ever needing to boot up the Windows environment.
Fixing Windows Shutdown Delays
If you followed this guide and now your Windows suddenly takes more than a minute to shutdown, this could mean that the AIM driver holds a lock on the LR-Catalog.vdi. Windows will wait to unmount the disk until it finally hits a hard timeout (usually 60 seconds).
To fix this, you can tell Windows to automatically unmount the drive whenever a shutdown is initiated. AIM comes with a low-level command-line tool (aim_ll.exe) that we can trigger using the Windows Group Policy Editor.
1. Create the Script: Open Notepad and add the path to your AIM executable followed by the -d (detach all) flag. It should look like this: "C:\Program Files\AIM Toolkit\aim_ll.exe" -d
Note: This script will run on every standard restart, Windows Update, and cold shutdown. However, if you have “Fast Startup” enabled in Windows, clicking “Shut down” puts the PC into hibernation, which bypasses Group Policy scripts. If you use Fast Startup, you will need to disable it (powercfg.exe /h off in an admin command prompt) for the automated unmount to work on normal shutdowns.
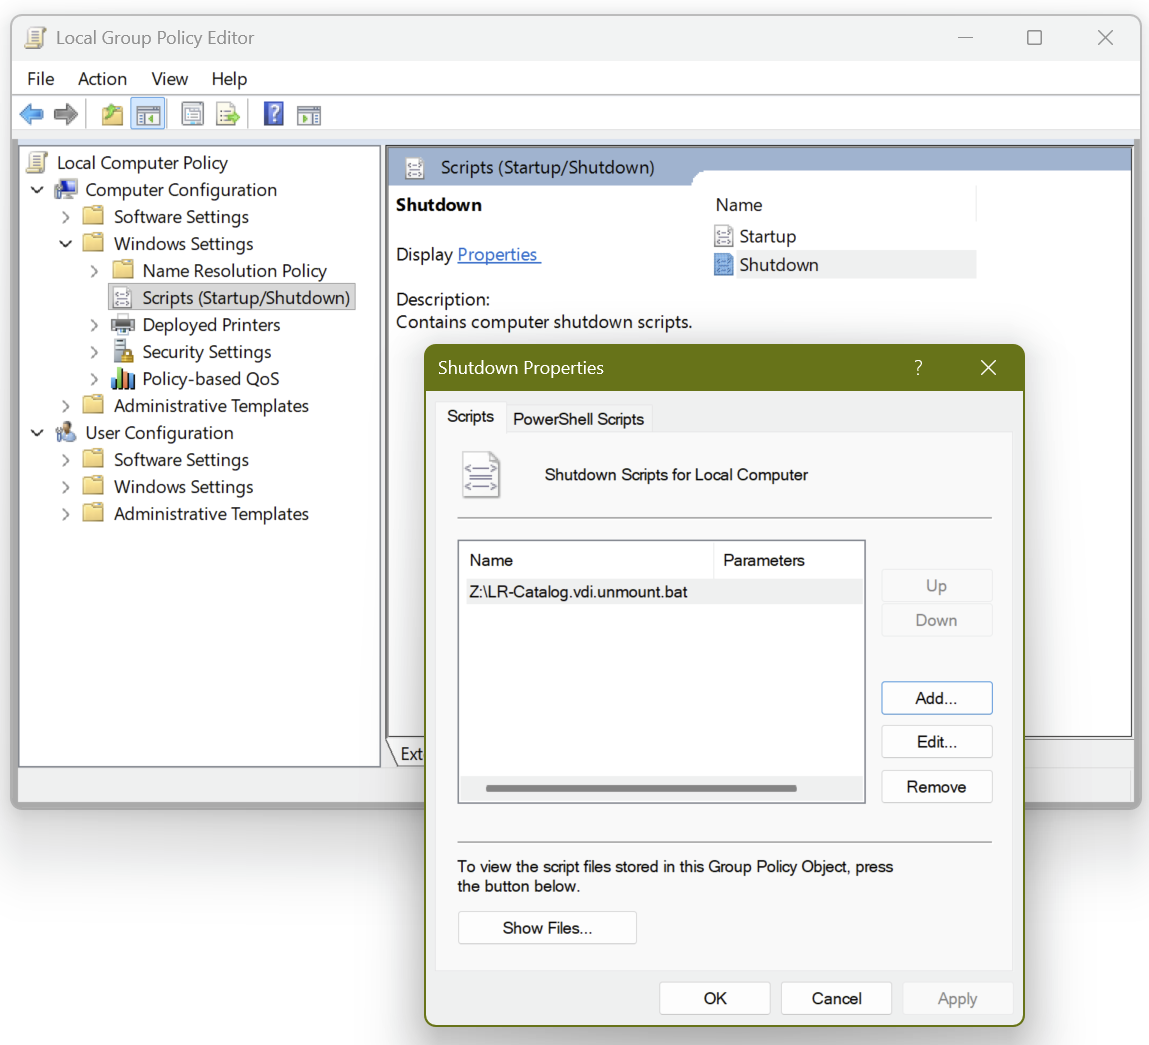
2. Save the Script: For easy organization, save this file in the exact same folder as your .vdi container, and give it the same name with _unmount appended (e.g., LR-Catalog.vdi.unmount.bat).
3. Bind to Shutdown: Press the Windows key, type gpedit.msc, and open the Group Policy Editor. Navigate to Computer Configuration > Windows Settings > Scripts (Startup/Shutdown) and add the .bat file you just created next to your container.
Note: Workflow and architecture by me; drafting, typing and formatting assisted by Google Gemini.